Here are some more thoughts on Street Photography after dark…
Black Sky
When you shoot something brightly illuminated against the night sky, it can turn out like a black curtain.
The image above is the sign from the deli where the famous scene from Harry Met Sally was shot – the one where she fakes it! I had gone there for a Reuben Sandwich during the day and it was near the hotel. I was trying to look at new perspectives and angles, so I just set up and shot from upwards from the street, isolating the subject.
It is almost an abstract image – the sign is completely isolated as though a black velvet backdrop was behind it. It is simple, and start. I like it, but it is not exhibition-worthy. I like to think of it as an arty reminder of touring NYC.
Create Scenes of Mystery and Intrigue
When do bars and brothels open? After dark… I know this from living near a brothel rather than from frequenting one (just in case Mrs Melbourne Street Photography is reading…) People feel more comfortable exploring their dark sides in the dimly lit corners of the city.
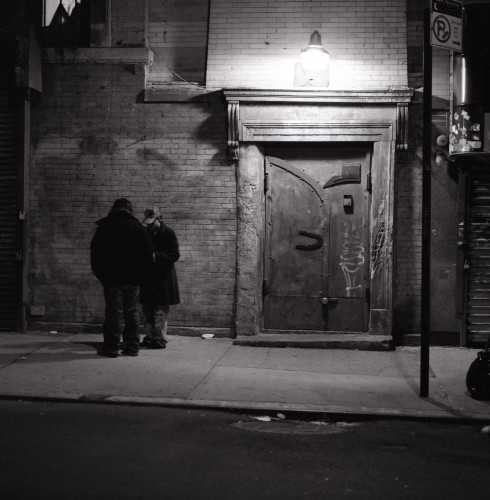
This image sold in the first ten minutes of my NYC exhibition a few years ago. Even with the passing of time, and despite the increasing harshness of my self-critiques, this image still brings me enormous please when I look at it. It has so many elements to love.
Setting Up
Shooting at night generally requires a tripod. The massive lump of medium format metal I was carrying around demanded quite a robust tripod and head. I was not particularly mobile. To take a great shot meant seeing the scene first, setting up, then waiting for the right subject to enter the frame. Patience. Don’t eat the lolly (refer to part one for explanation!).
I often find that I am moving quite quickly with my camera throughout the day. The ability to quickly snap a scene is an enabler for this. At night, I never accelerate past a gentle saunter, keeping my head up, looking for the right scene.
This doorway, despite being pretty cool in the photo was still a pretty subtle element on the street. I was walking on the opposite side of the street, and could have missed it, if I was in “day mode”.
I spent five or ten minutes setting up the tripod, framing the shot, and making sure my settings were correct for the light conditions. Think about all the conditions and what you can do to adapt. For this shot, I knew that I might have to camp in the spot for some time before the timing was right.
For me, street photography is about not interfering with the scene – like Star Trek’s prime directive :
No identification of self or mission. No interference with the social development of said planet. No references to space or the fact that there are other worlds or civilizations.
I try not to influence any image in any way – not always 100% possible, but that is my objective. To document, not to interject.
With this in mind, I looked around the spot I had chosen to set up, and realised that if I moved a little back, I would be under the awning of an alcove for a building – a spot that was a bit darker than the open pavement. I was not as obvious here, without looking like I was hiding or contemplating suspicious acts…
The final part of the set up was to connect the remote trigger. After committing the boundaries of the frame to memory, I just stood next to the camera with the trigger in my hand, at my side. There was no need to look through the viewfinder.
The Image
What works?
The door is a stand out. It is damaged, worn, and beat up. Yet still looks solid and steadfast. Like it is the last bastion against hordes of monsters, protecting the innocents inside. Scars always suggest character to me, and the suggestion of a story to tell.
The down light creates lovely shallow shadows that bring the three dimensions of the door to life. It also helps illuminate the scene for the shot without overly affecting the light meterings.
The plain brickwork to the left of frame was the area I had selected for some human subjects to create interest. Originally intending to wait from someone to enter from left of frame, and shoot when they were against the brickwork, I got lucky.
Two guys walked up and stopped there to exchange words or something. For just a moment, they had stopped in the light, in exactly the position I had envisioned in setting up the frame. The motor winder on the H1 started to wiz as I popped off two or three frames before they moved on again.
Being offset to the left of frame, balanced against the light of the doorway, makes for a nicely weighted image.
What doesn’t?
The street was a on a fair incline, so the slanting of the footpath is not to my liking, but is not a massive distraction. You can see the door base gives the level in the image.
I probably would have preferred it if the two subject’s edges were not overlapping. If they had been separate and discrete objects, the shot might have worked a bit better.
Things I Learned (and loved) Shooting New York City at Night

 October 15, 2016


Trackbacks/Pingbacks
[…] Part Three is here […]
LikeLike
[…] Part Three is Here… […]
LikeLike